
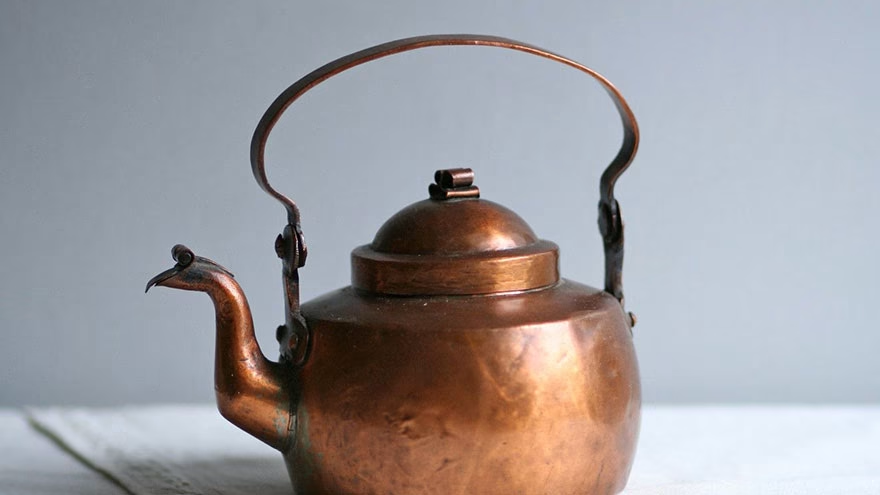
Identify the Kettle Before Cleaning
Before trying to remove sediment from a antique kettle, identify what you are cleaning. A copper kettle, brass kettle, cast iron kettle, silver-plated kettle, enamel-lined kettle, and tin-lined kettle should not all be treated the same way. Sediment may be mineral scale, rust, old tea residue, soot, or a mix of deposits.
Antique cleaning is different from routine kitchen cleaning because value can be tied to original surface, patina, maker marks, and history. If the kettle is rare, valuable, plated, or fragile, do not experiment with strong cleaners. Ask a conservator or experienced antiques professional first.
The Canadian Conservation Institute's guidance on caring for metal objects emphasizes understanding the metal and avoiding unnecessary cleaning. That is the right mindset for an old kettle: clean only as much as the object can safely tolerate.
Decide Whether It Is Decorative or Usable
Some antique kettles should not be used for drinking water. Old solder, worn linings, corrosion, unknown metals, loose seams, or damaged plating can make use unsafe. A kettle can be beautiful as a display piece and still be a poor candidate for the stove.
If you want to use the kettle, have it assessed first, especially if it is copper, brass, or has an interior lining. Do not assume that removing visible sediment makes it food-safe. Cleaning improves appearance; it does not certify the metal for use.
For collectors, condition and originality matter. Livecub's Fenton glass identification guide is about glass, but the collecting habit is similar: identify first, clean second, and avoid changes that destroy evidence.
Start With Dry Inspection
Look inside with a flashlight before adding liquid. Note the color, texture, and location of sediment. White or chalky deposits often suggest mineral scale, while reddish-brown deposits may be rust. Greenish corrosion on copper alloys needs special caution. Flaking, pitting, or powdery corrosion is a reason to stop and ask for help.
Remove loose debris first. Turn the kettle upside down over a towel and gently shake out dry flakes. Use a soft natural-bristle brush or a microfiber cloth for loose dust. Do not scrape with a knife, screwdriver, steel wool, or hard wire brush.
Photograph the kettle before cleaning. Take pictures of the inside, base, handle, spout, marks, dents, and seams. If cleaning changes the appearance, photos help you understand what happened and preserve a record for future owners.
This slow inspection also helps protect maker marks and seams. Once aggressive cleaning starts, it can be hard to undo. A patient first look is damage prevention.
Use Mild Soaking for Loose Sediment
For a sturdy kettle with simple mineral sediment, warm water may be enough to soften deposits. Add warm water, let it sit, then pour it out and wipe gently with a soft cloth. Repeat rather than forcing the buildup in one round.
If the kettle has a wooden handle, bone detail, loose solder, cracks, or decorative attachments, avoid soaking the whole object. Keep moisture limited to the interior where possible. Water trapped in seams can create new corrosion.
Use distilled water if the local tap water is very mineral-heavy. Hard water can leave new deposits behind after cleaning. This is a small detail, but antique cleaning often succeeds through small, careful choices.
Livecub's guide on cleaning Depression glass is for a different material, but the same patience applies. Gentle repeated cleaning is usually safer than one harsh attempt.
Use Acid Only With Caution
Modern kettles are often descaled with vinegar or citric acid, but antiques need more caution. Acid can remove mineral scale, yet it can also affect metals, plating, solder, and patina. If you do use it, keep the solution weak, limit contact time, and test only when you are confident the material can tolerate it.
Good Housekeeping's guide on cleaning a kettle discusses vinegar and lemon methods for modern kettles. Use that as general descaling context, not permission to treat every antique the same way.
After any acidic cleaning, rinse thoroughly with clean water and dry completely. Acid left in seams or pits can keep reacting. If the sediment does not soften, stop and reassess rather than making the solution stronger.
Never mix cleaning chemicals in the kettle. Vinegar, bleach, ammonia, and commercial cleaners can react badly or leave residues. For antiques, fewer products and shorter contact are usually safer.
Avoid Abrasive Shortcuts
Abrasives can make a kettle look cleaner quickly, but they may remove original surface, scratch soft metal, thin plating, and reduce collectible value. Steel wool, harsh scouring powders, rotary tools, and aggressive polishing should be avoided unless a qualified restorer recommends them for that specific object.
The National Park Service preservation guidance on historic metal cleaning is about architectural metal, but the conservation principle still applies: cleaning methods can damage original material when they are too aggressive.
If you need a tool, choose soft cloth, cotton swabs, soft brushes, or wooden skewers used gently. The tool should be softer than the surface you are trying to protect. Slow cleaning is surface respect.
For narrow spouts, resist the urge to force a metal brush through. A soft pipe cleaner may help if it does not snag, but forcing the spout can loosen seams. If the blockage is hard, stop and get advice.
Rinse, Dry, and Stabilize
After loosening sediment, rinse the kettle with clean water if the material allows it. Do not leave standing water inside. Dry with a soft towel, then allow airflow to finish the job. A hair dryer on a cool or low setting may help move moisture out of seams if used carefully.
Do not close the lid while the interior is damp. Trapped moisture can restart corrosion. If the kettle is decorative, store it dry with the lid slightly open or separated if that is safe for the object. Keep it away from damp basements and hot attics.
After drying, check the kettle again the next day. Moisture can hide in seams and under sediment that did not fully release. A second look helps catch new staining or damp spots before storage.
If new residue appears after drying, do not panic. It may be loosened mineral scale, old corrosion, or moisture carrying deposits to the surface. Repeat only the gentlest step that worked, then dry again.
Use a breathable storage spot after cleaning. Avoid sealing a recently cleaned kettle in plastic, especially if you are not fully sure it is dry. A stable shelf, low humidity, and occasional inspection are safer than hiding the object away and discovering corrosion months later.
Collectors who enjoy careful restoration may also like Livecub's affordable hobbies article because antique care rewards patience more than expensive tools.
Know When to Stop
The hardest part of cleaning an antique kettle is stopping before it looks new. New-looking is not always better. Patina, wear, and minor staining can be part of the object's story. The goal is stable and clean enough, not erased.
Stop if you see plating lifting, metal flaking, green powdery corrosion, cracks, loose seams, unexpected color change, or a smell that suggests old residues. Photograph the condition and ask someone qualified before continuing.
If you plan to display the kettle, keep it away from kitchens where steam and grease can settle on the surface. Display is still storage, and the environment keeps affecting the metal.
If the kettle has family history, write that history down and keep it with the object. Care is not only cleaning. It is also preserving what the kettle means, where it came from, and how it should be handled next.
For collectors, that written note can matter as much as shine. Provenance, careful handling, and restraint often preserve more value than aggressive cleaning. The best result is stable and honest.
Frequently Asked Questions
Can I use vinegar to clean an antique kettle?
Sometimes, but only with caution. Vinegar can affect metal, plating, solder, and patina, so identify the material first and use weak solutions briefly.
Is an antique kettle safe to use for boiling water?
Not always. Old metal, solder, corrosion, or worn lining can make use unsafe. Have it assessed before using it for drinking water.
What tools are safest for removing sediment?
Start with warm water, soft cloths, cotton swabs, and soft brushes. Avoid steel wool, knives, hard scrapers, and harsh powders.
Should an antique kettle be polished until shiny?
Usually no. Heavy polishing can remove original surface and reduce value. Clean gently and preserve stable patina where possible.

Linda Fehrman
Edits general wellness and relationship explainers. Health material is educational, avoids diagnosis and links to health-authority guidance.



Leave a reply
Replying to